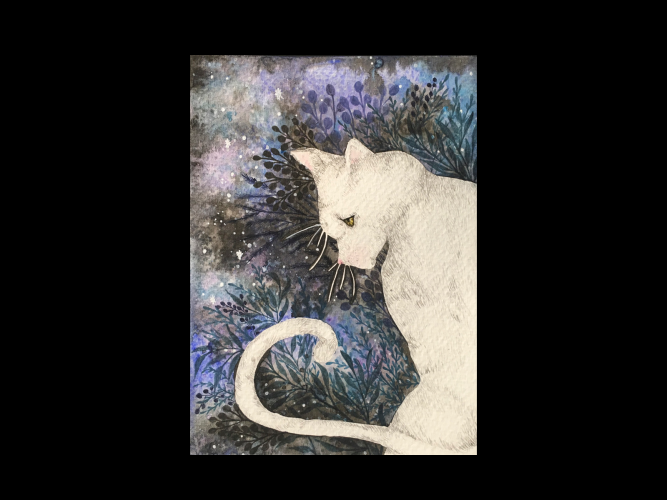
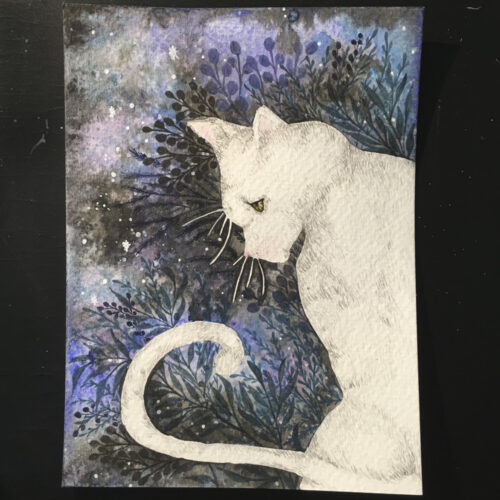
Who doesn’t love magical and starry night sky? It is the repertoire of colors and shades that makes it so mysterious. Learn to create a a gorgeous “Night Cat” painting with our first guest blogger Tulika from Nutsaboutpaint.
Tulika and I have been close friends for the past four years and apart from that we also share the same passion for art. I have always been curious to know her process of creating her intricate artwork and hence I approached her for a guest blog. And she was game!! And now Tulika is going to take over today’s blog. Enjoy!
Hello fellow creative people,
So I am called nutsaboutpaint. As the name suggests I am crazy/mental about painting. Everyday I get up in the morning, make myself a cup of coffee, sit in my study and paint till the cows come home (more like when my husband gets home). I am always thinking of what to draw/ paint next. My mind is always churning out ideas some work some don’t. It’s all about experimenting with different materials mediums and painting methods. So let the force of paint be with you!
Quick shout out to Life-athon. Thanks so much for featuring me!!!! I truly feel honored and humbled.
On that note here is a tutorial for ‘The Night Cat’
Supplies
- Water color paper.
- Cheap brush (which you don’t mind ruining).
- Windsor & Newton colourless masking fluid.
- Watercolour paint ( I used Daler Rowney).
- Paint brushes round 12 and flat 1” (brand I used Ashley).
- Paint brush round 1 aquafine (Daler Rowney). This brush is good for details.
- Tissue paper for dabbing access paint.
- White ink gel pen.
Steps
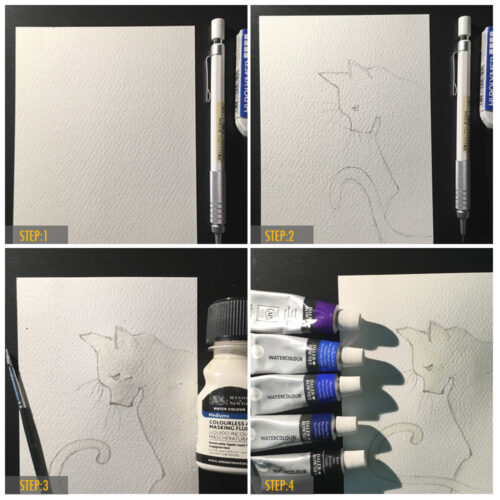
1.Get your paper, pencil and eraser ready. Think of what you want to draw. I drew a cat.
2.Draw your cat or any other animal you like. Once your happy with the sketch its time to paint (tip: add gentle pressure on your pencil, so the marks are light and easy to erase)
3.Now the fun begins. Take some of the masking fluid out on your palate and mix 2 to 3 drops of water and mix. Apply it to your cat. Let it dry for 20 mins or till it feels sticky when touched.
4.While waiting pick your colors for the night sky. I picked purple, different shades of blue and black.
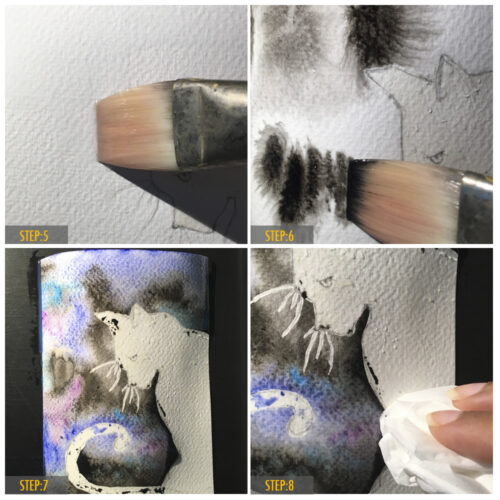
5.Wet the paper with water (flat brush). Now don’t be stingy with the application of water as this helps blend the colors. (tip: add water drops to your paint to make it a watery consistency. This makes blending easy as well.
6.Apply your colors (round 12). Start with the darker tones first then add the lighter colors.
7.Add all the colors one by one before the paper starts drying. Don’t be afraid to mix colors to make them appear darker.
8.Once your happy just dab the extra paint off with tissue.
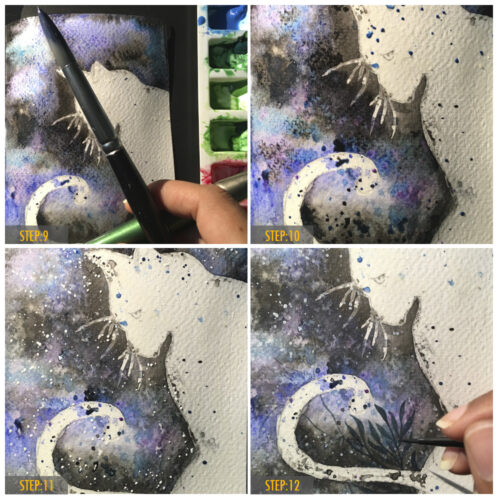
9.Now to create drops on your paper to give more depth to your sky. Take the round brush (12) dip it in black paint. Hit it against another brush to add sprays to your painting (as seen in picture step 9)
10.Repeat this process with the different blue paints. Do this till you are happy. Let it dry (tip: step 9-10 should be done will the paper is still wet.
11.Its time to add the stars. Dip the round brush in white paint and repeat the spray method. (tip: wait till the paper is completely dry)
12.This step is totally up to you. You can draw flowers, grass or leaves. Let your creativity run wild. I drew leaves and kept them in the same tone as my sky. I just made them a little darker.
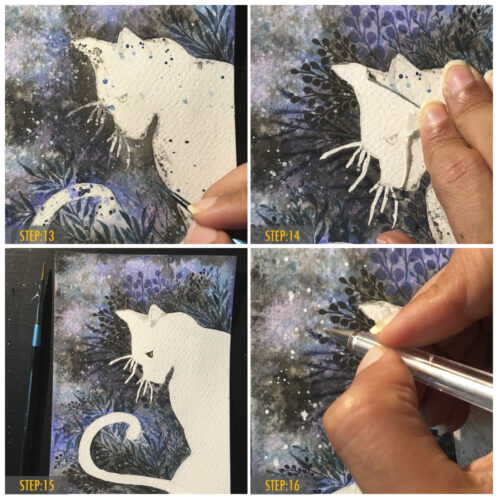
13. Still drawing leaves…
14.Remove the masking fluid by rubbing your finger over it slowly. It should come off really easy.
15.Once the masking fluid is removed your cat is ready. All you need to do is paint the cat’s eye.
16.The next two steps are optional. I am a sucker for details :
- I used a white ink gel pen to make the stars appear brighter.
- I also added some fur for the cat using the aquafine brush.
Taaaadddhhhaaa!!! You are done. Hope you liked the result.
Thanks a lot Tulika and I hope everyone has loved this tutorial as much as I did. This is definitely in my to-do list. You can find the wonderful works of Tulika on her Facebook page and you can also follow her on Instagram. Thanks a lot and have a great week ahead!
Cheers

